Building your first gaming PC represents an exciting milestone for any PC gaming enthusiast. While the process might seem daunting initially, modern components feature standardized connections and thoughtful design that make assembly straightforward. This comprehensive guide walks you through every step, from selecting compatible components to powering on your completed system.
Understanding Core Components
Every gaming PC comprises several essential components working together. Understanding each part's function helps you make informed purchasing decisions and appreciate how they interact during assembly.
The processor (CPU) serves as your system's brain, executing instructions and coordinating component communication. Gaming performance relies heavily on CPU capability, particularly in simulation-heavy titles and competitive games where high frame rates matter. Modern processors from both major manufacturers offer excellent gaming performance across various price points.
Your graphics card (GPU) handles rendering visual output, making it the most crucial component for gaming performance. GPU selection should align with your monitor resolution and desired quality settings. High-end cards target 4K gaming while mid-range options excel at 1440p, and budget cards handle 1080p admirably.
The motherboard connects all components, providing power delivery and communication pathways. Choose motherboards compatible with your selected CPU socket type, offering sufficient expansion slots and connectivity options for your needs. Premium motherboards provide better power delivery for overclocking and additional features, though mid-range boards suffice for most builders.
Memory and Storage Selection
System memory (RAM) provides fast temporary storage for active programs and game assets. Modern gaming systems benefit from 16GB minimum, with 32GB providing comfortable headroom for demanding titles and multitasking. Ensure RAM compatibility with your motherboard and CPU, paying attention to speed ratings and capacity limits.
Storage technology has evolved dramatically, with NVMe SSDs now offering exceptional performance at reasonable prices. Install your operating system and frequently played games on fast NVMe storage for optimal loading times and reduced texture streaming delays. Consider adding larger SATA SSDs or traditional hard drives for bulk game libraries and media storage.
Storage capacity requirements vary based on gaming habits. Modern AAA titles often exceed 100GB, making 1TB minimum recommended for primary game storage. Plan for future expansion when selecting initial storage capacity, as game sizes continue growing with each generation.
Power Supply Considerations
Your power supply unit (PSU) converts mains electricity into stable DC power for system components. Quality PSUs protect expensive components from power fluctuations while operating efficiently and quietly. Never compromise on PSU quality to save money, as failures can damage other components.
Calculate total system power consumption and select PSUs with adequate capacity plus reasonable overhead. Graphics cards represent the largest power consumers, with high-end models requiring 300+ watts alone. Add CPU and component power draws, then select PSUs rated 20-30% above calculated requirements for efficiency and longevity.
Efficiency ratings (80 Plus Bronze, Gold, Platinum) indicate how effectively PSUs convert AC to DC power. Higher-rated units waste less energy as heat, reducing electricity costs and thermal output. Modular PSUs allow removing unused cables, improving airflow and aesthetics though at premium pricing.
Case Selection
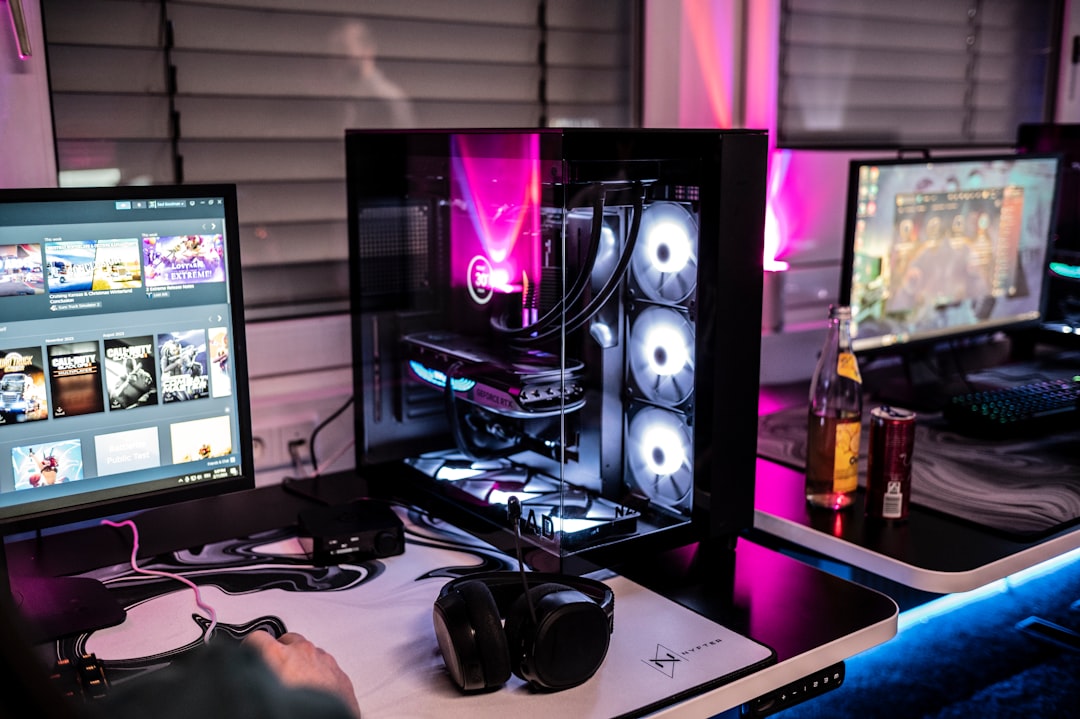
PC cases house components while providing cooling airflow and aesthetic presentation. Case selection involves balancing size, cooling performance, build quality, and personal taste. Larger cases simplify building and offer better airflow, while compact cases save desk space at the cost of tighter working conditions.
Ensure case compatibility with your motherboard form factor (ATX, Micro-ATX, Mini-ITX) and graphics card length. Modern high-end GPUs exceed 300mm, requiring cases with adequate clearance. Check CPU cooler height limits if planning tower air coolers rather than compact or liquid cooling solutions.
Cable management features like routing holes, tie-down points, and PSU shrouds simplify achieving clean builds. Good cable management improves both aesthetics and airflow by preventing cable clutter from obstructing cooling paths. Tempered glass side panels showcase your build but require careful handling to prevent shattering.
Cooling Solutions
Adequate cooling maintains component temperatures within safe operating ranges, preventing thermal throttling that degrades performance. Most CPUs include basic coolers sufficient for stock operation, though aftermarket solutions offer better performance and acoustics.
Tower air coolers provide excellent cooling performance at reasonable prices, with larger models rivaling liquid cooling effectiveness. Ensure cooler height compatibility with your case and check RAM clearance, as tall memory modules can interfere with some cooler designs.
All-in-one liquid coolers mount radiators with attached fans, circulating coolant through a CPU block. These solutions offer strong cooling performance with easier installation than custom loops. Radiator size affects cooling capacity, with 240mm and 280mm sizes popular for gaming systems. Verify case radiator mounting support before purchasing.
Assembly Process
Proper preparation makes assembly straightforward and stress-free. Work on a large, well-lit surface with adequate space for component boxes and tools. Anti-static precautions protect sensitive electronics, though modern components prove reasonably robust. Touch grounded metal periodically to discharge static electricity.
Install the PSU first, mounting it in the case with the fan oriented according to case design. Most modern cases position PSUs with fans facing downward for independent airflow. Route the 24-pin motherboard and 8-pin CPU power cables before installing the motherboard for easier management.
Prepare the motherboard outside the case by installing the CPU, RAM, and M.2 storage. CPU installation requires careful alignment to avoid bent pins on applicable models. Lower the CPU gently into the socket without forcing, then secure the retention mechanism. RAM modules click firmly into slots when properly seated, requiring even pressure on both ends.
Motherboard Installation
Install motherboard I/O shield into the case rear cutout before mounting the board. These shields snap into place but require firm pressure. Align the motherboard with standoff positions, ensuring I/O ports fit through the shield opening. Secure the board with provided screws, tightening moderately without overtightening.
Connect front panel headers following motherboard manual diagrams. These small connectors control power button, reset switch, and front panel LEDs. Polarity matters for LED connections but not switches. USB 3.0 and audio headers feature keyed connections preventing incorrect insertion.
Install CPU cooler according to manufacturer instructions, applying thermal paste if not pre-applied. Pea-sized thermal paste amounts suffice, as mounting pressure spreads paste adequately. Overtightening cooler mounting screws can crack motherboards, so tighten diagonally in small increments until firm.
Graphics Card and Storage
Remove necessary PCIe slot covers from the case rear before installing graphics cards. Align the card with the primary PCIe x16 slot and press firmly until the retention clip engages. Secure the card bracket to the case with screws for stability. Connect required PCIe power cables from the PSU, ensuring proper seating.
2.5-inch SATA SSDs mount in dedicated drive bays or behind the motherboard tray on modern cases. Connect SATA data cables to the motherboard and SATA power from the PSU. M.2 drives install directly on the motherboard, secured with small screws. Remove any heatsink covers before installation if your motherboard includes M.2 cooling.
Cable Management
Thoughtful cable routing creates clean builds with improved airflow. Route cables behind the motherboard tray through provided openings, positioning them to emerge near connection points. Use velcro straps or zip ties to bundle cables neatly, avoiding excessive tension that could strain connections.
Connect all necessary power cables: 24-pin motherboard power, 8-pin CPU power, PCIe GPU power, and SATA power for drives. Verify all connections seat firmly, as loose connections cause boot failures or system instability. Excess cable length tucks behind the motherboard tray or bundles in unused drive bays.
Initial Power-On
Double-check all connections before the first power-on attempt. Verify the PSU switch positions to the on position and that the power cable connects securely. Press the case power button and observe for signs of life: fans spinning, LED illumination, and POST beeps if equipped.
Systems that fail to boot require systematic troubleshooting. Verify RAM seating by pressing firmly on both module ends. Check that both motherboard power connectors attach securely. Ensure the CPU power cable connects properly, as forgetting this connection represents a common oversight.
Successful POST leads to BIOS screens where you can verify component detection and configure boot order. Modern UEFI interfaces provide graphical environments displaying temperatures, fan speeds, and detected components. Enable XMP/DOCP memory profiles for rated RAM speeds before installing the operating system.
Operating System Installation
Create Windows installation media using Microsoft's media creation tool and a USB drive. Boot from the installation media by selecting it in BIOS boot override menu. Follow installation prompts, selecting your NVMe drive as the installation target. The process typically completes within 20-30 minutes on modern SSDs.
After Windows installation, download latest drivers starting with chipset drivers from your motherboard manufacturer. Install graphics drivers from NVIDIA or AMD websites rather than relying on Windows Update versions. Update Windows fully before installing games and applications.
Post-Build Testing
Stress testing verifies system stability and cooling adequacy. Run CPU stress tests like Cinebench or AIDA64 while monitoring temperatures. Healthy systems maintain temperatures below 85°C under sustained load with adequate cooling. GPU stress testing through benchmarks like 3DMark or Unigine Heaven ensures graphics stability.
Monitor frame rates in actual games to verify performance meets expectations. Compare results against online benchmarks for your hardware configuration to identify potential issues. Lower-than-expected performance might indicate driver problems, thermal throttling, or incorrect settings.
Common Mistakes to Avoid
First-time builders often forget the I/O shield, requiring motherboard removal for installation. Install it first to avoid frustration. Forgetting standoffs between case and motherboard can cause shorts, though most modern cases include pre-installed standoffs.
Inadequate thermal paste application or forgetting to remove plastic protective films from cooler bases prevents proper heat transfer. Verify cooler bases appear clean and shiny before installation. Similarly, remember to remove GPU protective films from outputs and decorative elements.
Connecting monitors to motherboard display outputs when discrete graphics cards are installed results in poor performance or no display. Always connect monitors to graphics card outputs when one is installed. The motherboard outputs typically disable automatically when GPUs are present.
Future Upgrades
Quality initial component selection provides upgrade flexibility as needs evolve. Select motherboards with multiple M.2 slots for storage expansion. Adequate PSU capacity accommodates future GPU upgrades without replacement. ATX cases provide ample space for additional drives and cooling solutions.
RAM and storage represent the easiest upgrades, requiring simple installation without system reconfiguration. GPU upgrades provide the most noticeable gaming performance improvements, though ensure PSU capacity and CPU capability support upgraded cards. CPU upgrades require compatibility verification and possible BIOS updates before installation.